


Knowing the best combination of indicators and technical indicators to use can greatly improve your chart reading skills. Using the wrong technical indicators can result in inaccurate price interpretation, leading to poor trading decisions.

The Trading Strategy Guides team has meticulously curated every technical indicator so we can provide the best performance for each individual trading strategy we create. Also read the best ADX strategies.
However, if you are a price action type trader who only uses naked charts, you can safely check out our Ultimate Chart Patterns Step-by-Step Guide.
Technical indicators make it easy to identify current price trends and predict where prices will move in the future. Developing an effective technical analysis strategy can help you increase your trading amounts on a daily basis.
However, while all technical indicators are useful, each has its own weaknesses. If you are using only a single indicator to monitor the market, there may be a particular price trend (or risk) that you are not aware of.
By combining multiple technical indicators into a single trading strategy, you can limit your risk while still earning high returns. Below we describe how to create a multi-indicator strategy.
A multi-indicator strategy should avoid duplication and use the best combination of trading indicators in a meaningful way. There is also training on the average true range indicator.
Multi-indicator strategies run the risk of overlap because multiple traders use indicators that represent the same type of information. To avoid getting stuck with this trading error, you need to understand that technical indicators can be categorized into three groups:
- Trend-following indicators allow you to determine if an asset is currently overbought or oversold. Many trend-following indicators, such as Bollinger Bands, try to create clear “channels”. A clear channel lets you know if the price spikes or returns to normal.
- Momentum indicators such as the Relative Strength Index (RSI) allow us to determine the direction and strength of the current price trend. As the asset starts to build momentum, opening new positions will become less risky. Looking at the moving average indicator helps you gauge your momentum.
- Volume indicators help traders identify a (strong) relationship between price and volume. An increase in trading volume almost always increases the price. However, these events do not always occur simultaneously, making volume indicators suitable for advanced forecasting. On Balance Volume (OBV) and Money Flow are two of the most useful indicators.
As you can see, indicators in these categories try to determine what angle each item offers is the same whether the price is going to rise, fall or remain stable. Looking at the market from multiple angles will help you develop a more accurate, realistic and actionable perspective.
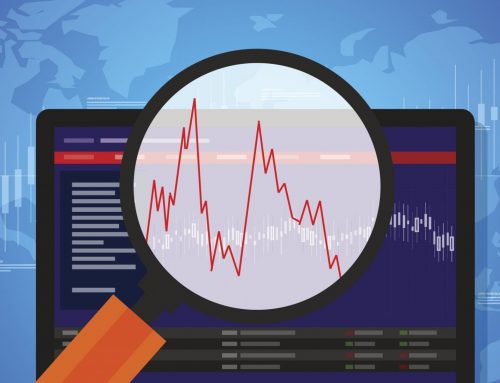
Basically, if you are trading with a multi-indicator strategy using RSI indicator, MACD indicator and Stochastic indicator, you basically use 3 types of technical indicators that fall under the same category.
These are all momentum indicators that will show you the same kind of information in one way or another. In the picture above you can see how all the indicators follow simultaneously.
this is not good!
The problem with using technical indicators that don’t fit is that you might think that a trading signal is actually stronger if all the indicators are pointing in the same direction.
Correcting overemphasis of information using indicators belonging to the same group is very simple. Avoid using technical indicators that display the same kind of information. The best strategy is to combine indicators that show different types of multiple indicator information.
Best Strategy Multiple Indicators
Now comes the fun part.
Going forward, we will highlight which indicators to use for the best strategy multi-indicator.
We will be using momentum indicators, trend-following indicators, and volume indicators that complement and complement each other.
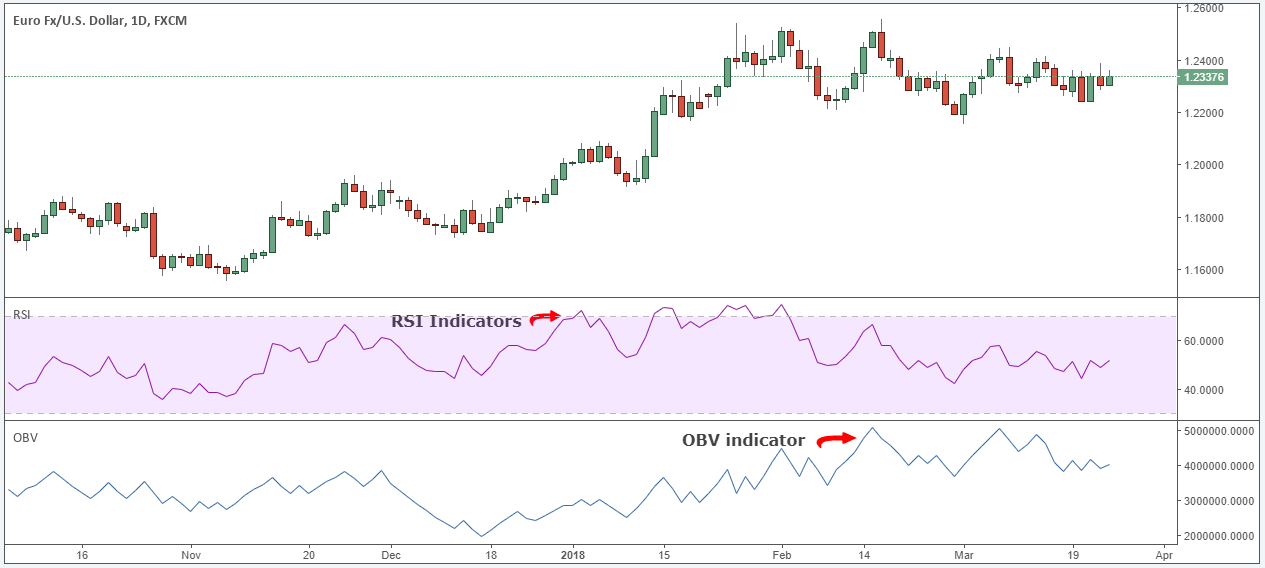
RSI Momentum Indicator
We don’t spend time explaining how the RSI is built because we live in the computer age and the RSI automatically works for us.
The relative strength index is the main indicator simultaneously with the momentum indicator. Many traders like the RSI indicator because it is easy to use.
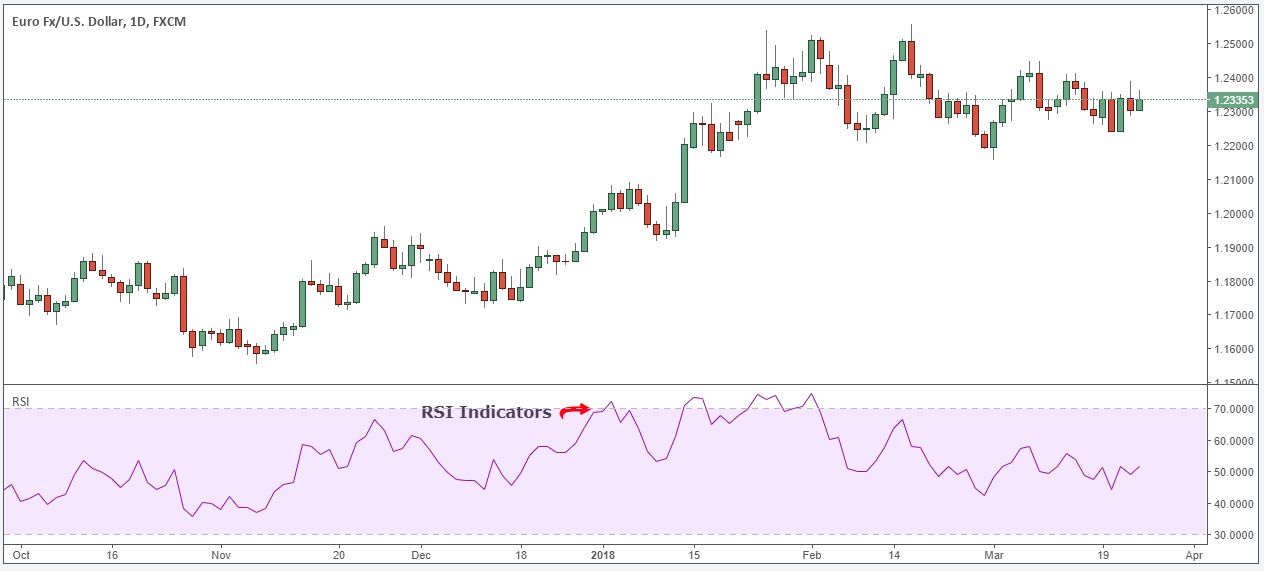
We use the RSI indicator to identify overbought and oversold conditions in the market.
Next, I’ll mention the second metric.
See below…
OBV – Volume indicator
The second indicator used in the strategy is the OBV indicator.
The OBV indicator is based on the idea that volume and price action are equally important. In this regard, OBV combines price and volume to show the total amount of money entering and leaving the market.
The screenshot above shows what your chart setup would look like if you followed the instructions above.
The main idea of the On Balance Volume indicator is that the market price will follow where the volume flow is going.
Now all we need to do is name the last technical indicator that will complete our multi-indicator strategy.
Ichimoku Kinkohyo (Ichimoku Cloud)
Ichimoku Cloud is another popular trend indicator. Ichimoku Kinko Hyo will draw several different lines on the chart to help you easily identify future instances of strong support or resistance.
The indicator’s chart has a blue line (Kijun Sen), a red line (Tenkan Sen), a green line (Chikou Span), and a red/green band (Senou Span). Each of these lines must be taken into account for accurate movement readings.
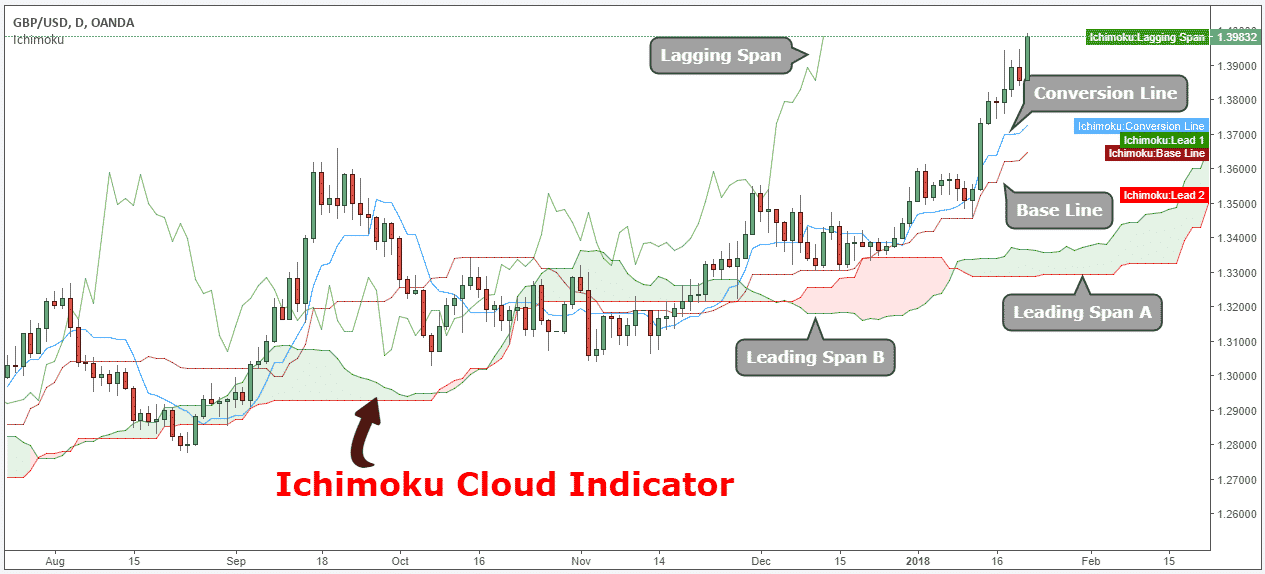
The blue line (reference line) displays the average of the highest high and lowest low over the last 26 trading periods. Similarly, the red line (turning line) displays the average of the highest high and lowest low over the last 9 trading periods.
The gentle green line marks the closing price 26 periods in the past. This can give you a better perspective on trend monitoring.
- The first band is calculated by averaging the blue and red lines.
- The second band is calculated by averaging the highs and lows over the last 52 trading periods.
The final step is to grab the trend line and advance it 26 cycles. When all these lines are drawn together, you have a broad view of the market. This is where you can decide whether you have strong enough tendencies to justify opening a new position.
Bollinger Bands – Trend Following Indicator
Bollinger Bands are the leading trend according to an indicator that measures the volatility of a particular market. It is also the third indicator of the best strategy multiple indicators.
Buying and selling based on Bollinger Bands can be a very effective trading strategy, especially when used in conjunction with other technical indicators.
Finally, your chart setup should be similar to the chart above.
Without further ado, let’s take a look at how to trade efficiently using multiple technical indicators and how to make consistent returns smart.
Multi-indicator strategy
For our strategy, we need to use 3-4 technical indicators to trade successfully. These metrics include Relative Strength Index, Ichimoku Cloud, Bollinger Bands, and On Balance Volume. Collectively, these indicators describe the trend, momentum and volume aspects of trading that all traders should pay attention to.
Now, before we go any further, it is always a good idea to bring a paper and pen and write down the rules of your trading strategy. In this article, we will look at the buying side.
Note * This strategy works for all time zones, apply it to your preferred time zone.
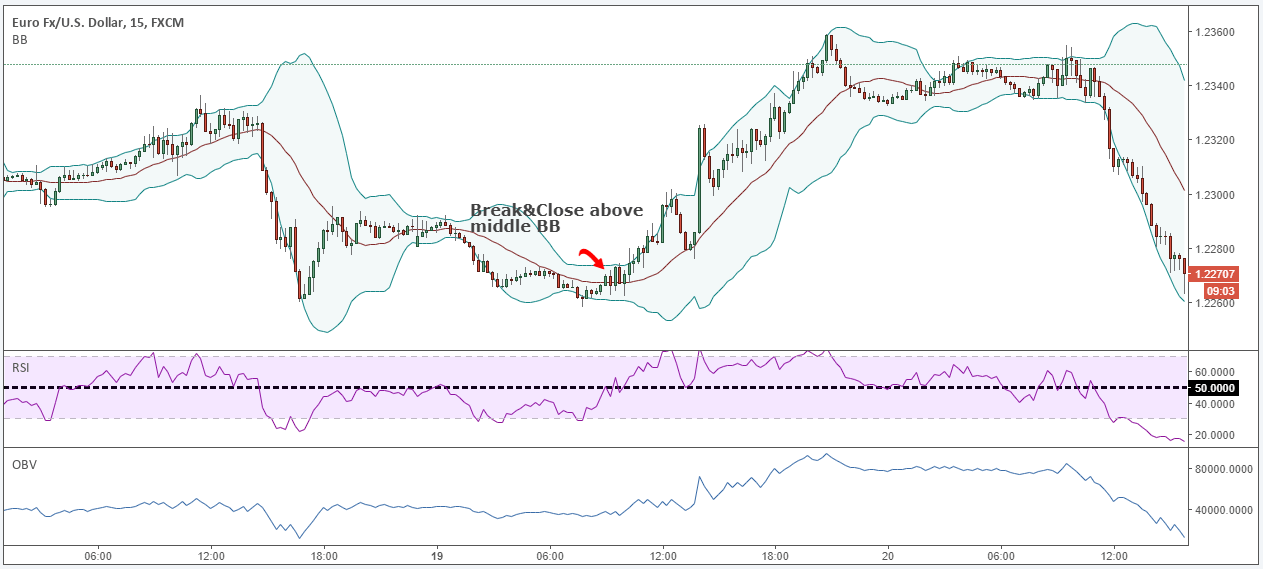
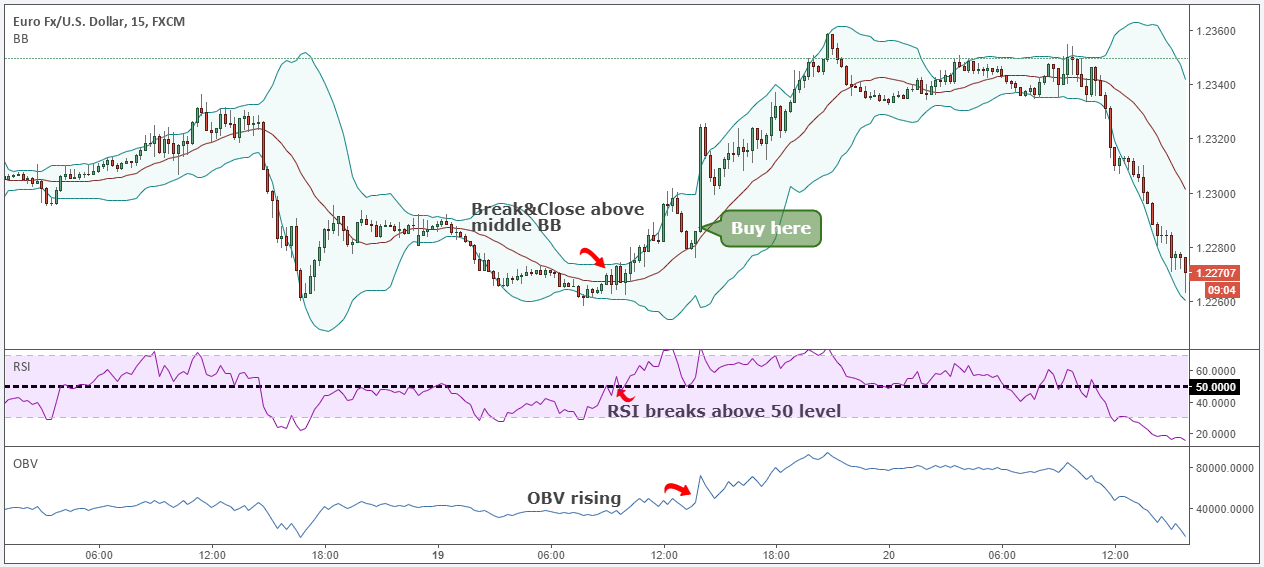
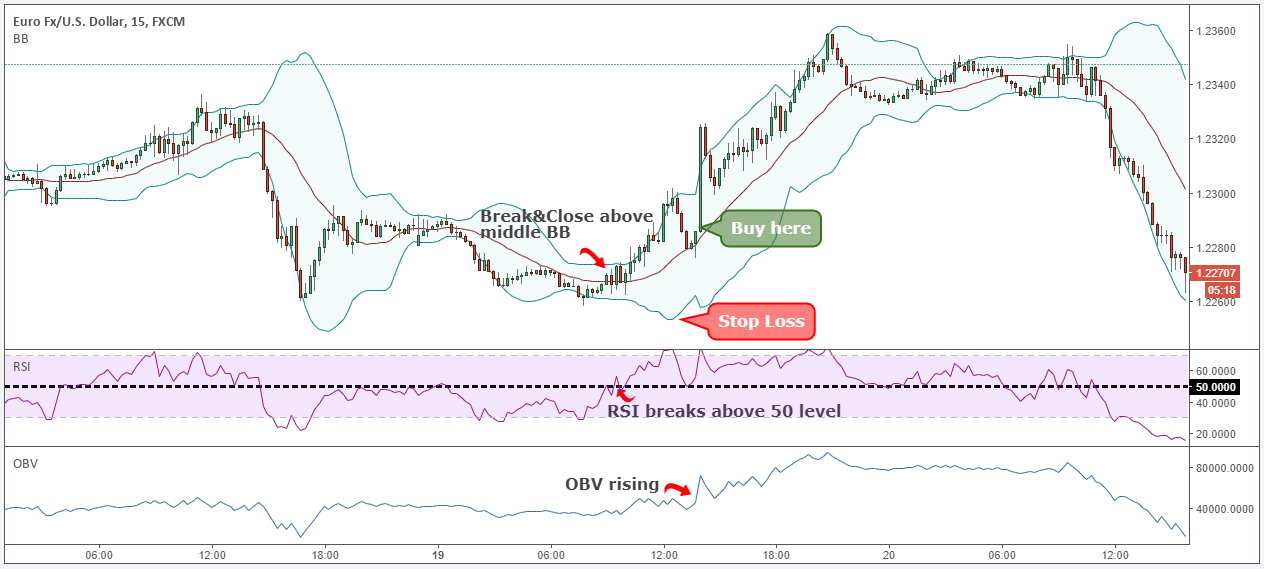
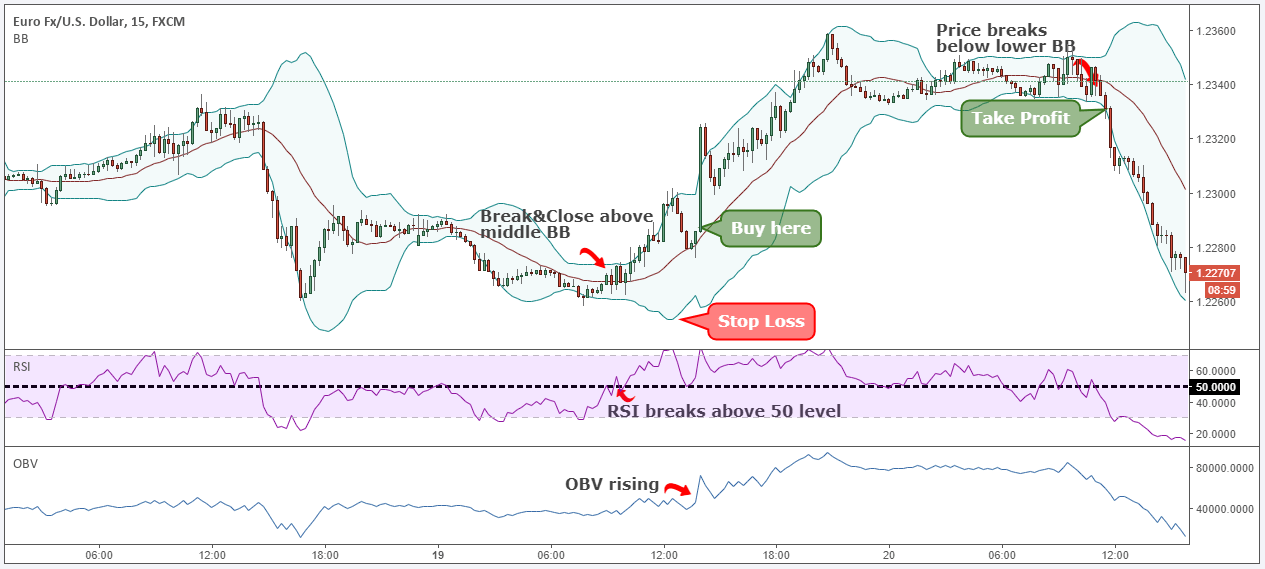
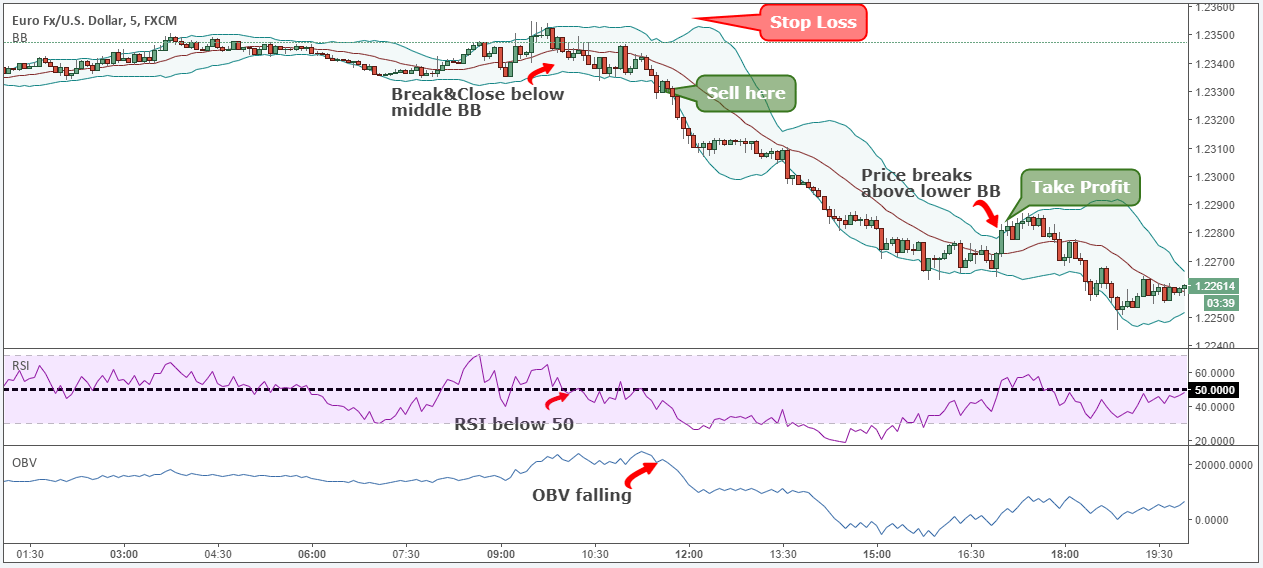
Step 1: The price needs to break above the middle Bollinger band.
The first step is very easy!
In fact, the entire strategy is so easy to understand that you can start trading right away.
So, the first trade confirmation we need is for the price to rise above the middle Bollinger band. Once this trading condition is confirmed, you can check other indicators to add more confluence to your trading signals.
Now let’s take a look at the RSI indicator’s opinion on price action.
See below…
Step 2: Wait until the RSI indicator has yet to cross the 50 level
Everything you do in our trading strategy guide is logical! We always try to understand how to properly interpret the behavior of a given technical indicator.
At this stage, we find a consensus between Bollinger Bends’ words and the RSI’s own price reading. So, if the momentum is behind the move, you can confirm the breakout.
Generally, RSI readings above the 50 level are considered positive momentum and RSI readings below the 50 level are considered negative momentum.
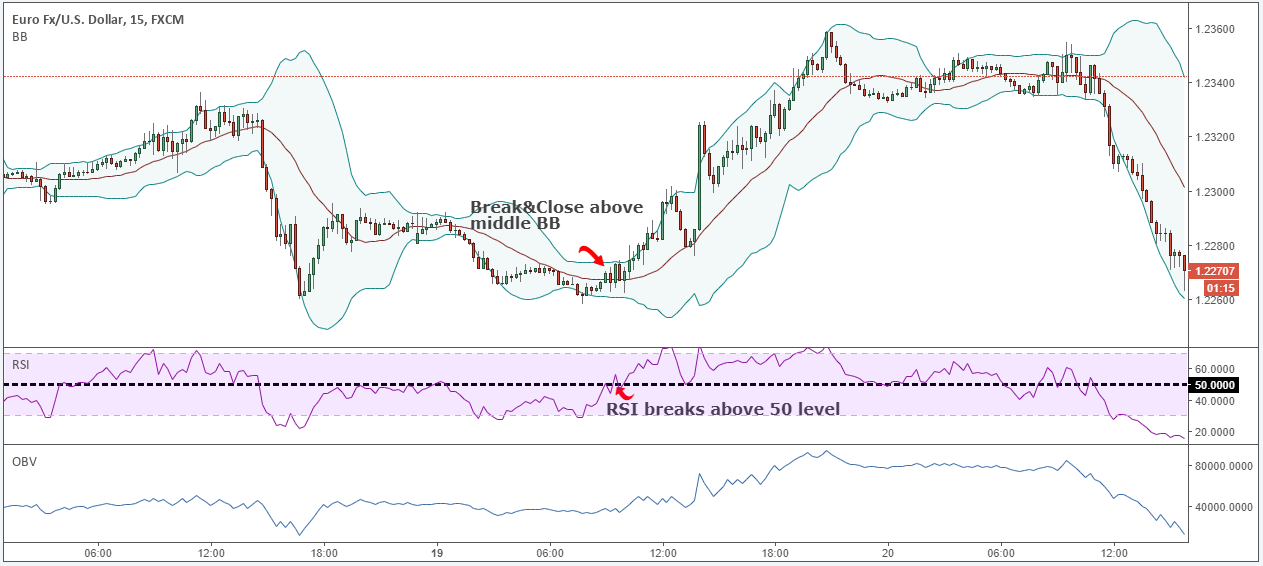
Note * Not every time the BB median price rises, the RSI breaks above the 50 level. Sometimes you have to wait longer for bullish momentum to emerge.
Step 3: Wait for the OBV indicator to rise. When volume confirms price, buy from the market.
The last trade condition before pulling the trigger is again easy to understand. We want to trade with smart money. In this regard, we look for evidence that transactions are being considered for real purchasing power.
You can see the actual volume came later. Before entering a long trade, it is important to be patient and wait for the exact trading conditions to be met.
The next important thing to set for your expansion strategy is where to place your protection stop loss.
See below…
Step 4: Hide the protective stop loss below the lower Bollinger band
Knowing where to place a protective stop loss is just as important as knowing when to enter the market.
A logical place to stash a protective stop loss is below the bottom of the Bollinger Bands. If your BB is low, your trading idea is invalidated and you want to minimize your losses.
Finally, we need to define the profit level for our multi-indicator strategy which brings us to the final step.
See below…
Step 5: Take Profit When Price Drops Below Low BB
Our profit-making strategy only looks at one indicator to inform possible exit zones. It may even give you back some of the revenue if you’re waiting for confirmation of multiple indicators.
The best way to profit in this regard is to watch the price reverse. A break below the lower Bollinger Band is a good sign of a possible reversal, so you want to cash in your profits.
Note ** The above is an example of a BUY trade using multiple technical indicators. Use the same rules for SELL transactions. In the picture below you can see an example of a real sale transaction.
We choose these indicators as a group because they can protect you from each other’s weaknesses and help you maintain each other’s strengths. It is your responsibility to decide whether you are willing to take a riskier position if these indicators provide contradictory buy or sell signals (and signals that do sometimes occur).
On the other hand, if you check the signals that each indicator is sending out from the others, you can feel more confident about your trades. If you find multiple “green lights” at once, be a little more active in your trades.
Conclusion
You need to take the necessary time and learn what each technical indicator means. No indicator gives a 100% win rate, so I’m not one to chase Fairy Tail. In the $6 trillion foreign exchange market, no one can accurately predict the market. Here’s how to apply technical analysis step by step.
However, by following the best combination of technical indicators, you can increase your chances of winning more often than losing market trades. Since all indicators are based on historical prices, only a multi-indicator strategy can predict the future.
Thanks for reading!
If you have any questions about the best combination of technical indicators, please leave a comment below!
Also, if you were satisfied with this strategy, please give it a 5 star!